Showing posts with label WINDOWS. Show all posts

Friday 14 June 2013

How To Make Windows 8 Faster | Run Super Fast

Posted by M Qasim A Siddiqui

How To Make Windows 8 Faster | Run Super Fast – Follow The Below Guide

Disable Startup Programs

For Making Windows 8 Perform Faster you need to customize and Make certain Changes in the Configuration or Settings of Windows 8. There are few programs that can consume maximum resources and Make Your system to Perform at a Slow Rate.Therefore it is Necessary to Disable These Unwanted or Unnecessary Programs and to Do this First  You Have to identify these Programs and After that You can disable or stop such programs in two Different ways:
Method – 1
At times, the start-up programs can slowdown Your Whole system. Windows 8 Task Manager provides you the option to Identify these programs and allows you to disable them. To do this first launch Task Manager, select Start-up and selectively disable the programs One by One.
Method – 2
Second option to make Windows 8 faster is to ‘Pin-point applications.’ To do this, right click on the Task bar and open Task Manager. You would find ‘More Details’ option and here you would see a list of certain programs highlighted. Make Free Voice Calls Anywhere Those are the programs that are consuming more resources and slowing down the system. This list would show which program is high on consumption of critical resources like CPU, Memory, Disk and Network. Simply disable such programs. This is called as ‘Pinpoint Application.’

Change Power Settings in Windows 8

By Changing the Power Settings in Windows 8  You can Make Your Windows 8 Run Faster.Lets Take a look at the power settings. To Open power settings Just press Windows button and Type ‘power plan’ and Press Enter. Now you would see Power Options window. Windows recommends “Balanced” power mode and ensure that this option is selected. Do not select “Power Saver” option under normal operations as it is intended to get more life out of battery only.
Screenshot Showing Power Configuration
How To Make Windows 8 Faster

Optimize Windows 8 Visual Appearance

An attractive feature of Windows 8 is its desktop animations. They are cool and attractive for sure but can also make Your Windows 8 OS to Perform at a Slower Rate. So, disable these animations to get an improved Overall System performance. How to Play Android Games on PC To do this, Just press the Windows key and type ‘System Performance Properties.’ Check the “Custom” radio button and now uncheck the button called “Animate Windows when minimizing and maximizing.” Also you can uncheck “Fade or slide menus into view”, “Fade or slide ToolTips into view”. The last two will add little speed of the OS.
Screenshot Showing Visual Optimization

How To Make Windows 8 Faster

Disable or Uninstall Third Party Antiviruses

Windows 8 Comes with Pre-installed Windows Defender so You don’t need third party anti-virus software which in turn can slowdown Your OS. Instead of Using these Antiviruses Just enable the ‘Included Security Applications’ which would run the Microsoft’s own anti-virus program called Windows Defender.

How To Make Windows 8 Faster

Use Sleep Mode Instead of Shutting Down

Instead of shutting down the system when you go away from the system temporarily, use Sleep mode of Windows 8. When you resume the system from sleep mode, it immediately gets back to the speedy mode. Also, during sleep mode your system does consume very low resources.

Optimize Your Hard Disk Performance

Hard drive optimization will add to the speed of Windows 8.  To optimizing the hard drive use Windows Optimize Drive Tools (known as Disk Defragmenter in older versions).You can Easily Access the Optimize Drive Tools by typing the Keyword in Windows key and select ‘Settings.’ You would find “Analyze” and “Optimize” buttons. Select the drive and click Optimize. Prior to this you can carry out analysis of the drive.
Screenshot Showing Hard Disk Defragmentation
How To Make Windows 8 Faster
These above steps should make your Windows 8 to perform with optimized speed and Giving You a Faster Experience while Running Applications on Your Windows 8.
For knowing about latest updates, news, official announcements about upcoming versions of Windows 8, Visit Here – Click Here

Thursday 6 June 2013

How to Take Screenshot Of Active Window Only.

Posted by M Qasim A Siddiqui

Take screenshot of Active Window Only

  • First of all Switch to the Application or Windows of Which you want to Take Screenshot
  • Now Press PRINT-SCREEN Button  to Capture the Screenshot
    e.g
  • Next You Need to Paste the Screenshot in the Desired Location i.e Paint or Document etc.Here below is an Example of Screenshot of Active Window Onlytake screenshot of active window only

Note – Important Tips

  • GIF Format is the Best Image Format for Saving the Screenshot of Active Window or ApplicationsWhereas JPEG Format makes the Image Quality Poor by making them Blurry and Blotchy
  • If You are Using Microsoft Windows 7 or Windows Vista You Can Use the Default Snipping Tool Built Within the Windows for Capturing the Screenshot of Active Window or Application Only

Monday 3 June 2013

Minimize All Open Windows In 1 Sec ... :)

Hey Friends I m Back with New Trick..


This is very Simple And Easy way to Minimize ALL open Windows in A sec.... 


Shortcut – Windows logo Key + M


e.g


-->

Saturday 1 June 2013

How to Use WhatsApp on PC or Laptop?


How to use Whatsapp on Computer?

Are you the one who do not have a smart phone? and still want to use whatsapp?


Then you are at the right place now you can use WhatsApp on your PC for free. WhatsApp helps you to connect with friends and family.


Yes its very simple you need to install 'Bluestack' offine installer to run WhatsApp on your pc.

Install Whatsapp on your PC:

  1):  Go here and Download bluestack setup
  2):  Now open the downloaded application


 3):   Now click on the Apps Tab and download WhatsApp.
 4):   You can find downloaded App in 'My Apps'.


 5):   Now click on WhatsApp and fill the details and start using it.
 6):   If you want to Uninstall app just hold the App and then click cross button.

Thursday 2 May 2013

How to Play Android Games On Laptop or Pc


♥Don't have any Android mobile and still want to play Android games?
Want to check android app before installing it on Mobile Phone?
Want to sync Android app from Mobile to Pc or laptop?

Then you are at the right place. We have answer for all your Questions :)

In this article, we let you know How to play Android Games on Pc and laptop.


Android has been capturing the Smartphone market increasing its boundaries way beyond its competitors. Out of the many options of android that attract users, App plays a key role among them. Now you can play several interesting games on android. Developers are developing a lot of new android applications and it's very difficult to check each of them by installing in the phone or Tab. Thus recently some softwares came into exist that helps us run android apps and games on computer and laptop.

Advantages:
    Now You can play android games on laptop or pc
    Now you can check android apps and games before you install in your mobile phone
    Now you can sync android apps from mobile to computer
    Now you can play your favorite games on big screen by playing on laptop or pc


Steps to Install all the android apps and games on PC or Laptop:
 

There are many softwares available online which helps us to run android apps and games on windows. But i found 'Bluestacks' is the best Software among many.

1): Click here to download "Bluestacks".

2): Once you download the BLUESTACKS then double click on it. Then it will get installed on your PC or Laptop. After Installation you can play your favourite game using Bluestacks.

3): Cloud connect helps you to sync your phone apps on computer.

4): You can find this feature by clicking on settings at the right end.

5): As soon as you have to click on cloud connect and then enter you Email address, your mobile number and then click register (now a pin will be sent to your email address).

6): Now from your Android mobile phone get Bluestacks application and install it on your phone.
   
7): As soon as you open the application it will ask for you 'PIN'. Now enter the PIN that you recieved to your email during registeration process.

 
So that's it :)

Tuesday 9 April 2013

How to Block USB Ports in Windows


Today in the modern world USB devices are very common among computer users.Nowadays the USB device has become the greater special quality in saving the important files and all other documents. It’s very commonin the world because of it’s a movable and large disk space produced.


Either we are using apersonal computer or laptop in any places it can be even in office. Computersor laptops having a possible or open USB ports on our machines can setup acomputer guard threat where any person using computers can plug in a enablevirus infected flash disk, outside hard drive, or any other USB competentdevices. And also within our computers unlimited USB ports also can be createdby an uncontrolled flow of data belonging to a corporation data or other usersare enabling to act out personal.   


How to Disableor Block USB Ports in Windows

1. Click Start, andthen click Run.

2. In the Open box, type regedit, and then click OK.


3. Locate, and then click the following registrykey:
HKEY_LOCAL_MACHINE\SYSTEM\CurrentControlSet\Services\UsbStor


4. In the right pane, double-click Start.


5. In the Value data box, type 4, clickHexadecimal (if it is not already selected), and then click OK.


6. Quit Registry Editor.

How to use a USB Flash Drive for RAM Memory?


We use USB to transfer the data’s. The USB can be used asRAM. Let’s start with windows vista; those who use pc’s can use their USBdrives to increase the performances of their computer. This is called ReadyBoost.  Ready Boost deal with free spacethat is on your USB drives, such as RAM. When we increase RAM that’s equal to more speed.  Ready Boost comprise on all free versions ofwindows vista and windows 7. It’s easy to setup the positions and in fewminutes it can be finished.

How to Use a USB Flash Drive for RAM Memorythumbnail

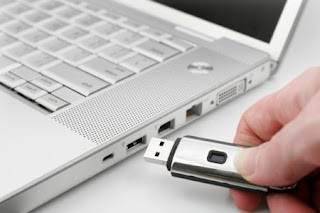
  • Insert the USB drive in your computer.
  • Go to "My Computer" then right-click on the USB drive. 
  • Go to "Properties"
  • Next, click on the "ReadyBoost" tab.
  • Choose the option that says "Use this device".
  • Under "Space to reserve for system speed", select the amount of memory that you wish to use for your USB flash drive. The amount of memory that Windows recommends is usually the best setting and should not be exceeded.
  • Click on "OK" to save your settings and exit.
  • Restart your computer for the changes to take affect.

How to check your Pen-Drive is Original or Fake

.. Nowadays we can buy Flash drive at low price. We can buy 32GB flash drive for only 10 $. Mostly these are fake drives. Now flash drives also manufactured as fake and its it's look like original one.  These type flash drives are mostly imported from China. They are using some small programs to show 4GB pen drive as 32GB.


How to check your Pen-Drive is Original or Fake


So let's check your Pen-drive is original or fake

H2Testw software is one of the best software to check Pen-drive is original or not. Also you can check your Memory Card with this software.

Click here to Download H2Testw

Empty the files on pen drive before checking
Click on Target DeviceNow select your Removable device
Then Click Write+Verify button.
If your pen drive is original, a message will appear as "Test finished without errors"

Lock your PC with Pen-Drive

.. We can lock Laptops with Finger print reader, Eye Scanner, Face Recognition etc.. but what about the personal computers?


Lock your PC with Pen-Drive

You can lock your personal computer with USB by using Predator. If you lock your PC with Predator, computer will work only when the USB in plugged in.
If you removed USB from computer , Mouse and Key board will get disabled automatically and screen will get dark. To unlock the computer, you should insert the USB again.

Click here to Download Predator
Now install the software.
Predator will launch automatically after the installation.
Now insert USB to the computer
you will get a message to set new password.
click on OK and set your New password
Then Choose the correct Drive letter from "USB Key Drive"


Lock your PC with Pen-Drive

After this click on Create Key
Then Click on OK

Note : This process will not format your USB. 

How to Recover Deleted Files without Using Software


In this post I'm gonna discuss an easiest Data Recovery Method.
Sometimes we might have delete some important files accidentally and we need them back.
Today I'll show you a trick to recover your deleted files without using any 3rd party software. I'm not talking about restoring files from recycle bin.
This simple trick mostly works on Vista versions and all the Windows 7 versions.
How to Recover Deleted Files without Using Software


So let's see how to recover deleted file without using any software 

For example lets assume that you have permanently deleted "My Sweet Heart.JPG" from the folder named "My LIFE" ;) , and now you want to recover "My Sweet Heart.JPG"back.
Do this simple trick to recover your Sweet Heart.JPG
Right Click on the particular folder
Select "Restore previous versions"

How to Recover Deleted Files without Using Software


That's all, now you will see a option to recover the particular file.

How to Recover Deleted Files without Using Software


If you don't see "Restore previous Versions" by Right Clicking, Go to
Control Panel -->
System and Secutiry -->
System -->
Click on System Protection (in left sidebar) -->
Select the particular drive and Click Configure -->
Then select "Restore system setting and previous versions of files" -->
Now Click on OK

Note : 
Previous versions come from restore points or from windows backup.
This trick will not work at all the time.


If you haven't get back your deleted files yet,
Use this Powerful Data Recovery Software (Recuva) to recover your deleted files.

Saturday 16 March 2013

Download Glass Skin Pack for Windows 7


Download Glass Skin Pack for Windows 7

Hello friends, Today I came with one of the most beautiful tips about Windows 7. Most of you get bored by using the same interface in your Windows 7 PC. So here I'll give you the Glass interface skin pack for Windows 7.
Download Glass Skin Pack for Windows 7

This free Glass interface skin pack will make your Windows more attractive and colorful. After the installation completes you will feel a fresh mind while working with Windows 7. If you're a Windows 7 user, don't wait anymore. Download the free skin pack and transform Windows 7 to Glass GUI. You can download both 32-bit and 64-bit from following links.

Download Glass Skin Pack for Windows 7 32-bit

Note: Before install this skin pack, uninstall if any other skin pack installed.

How to Hide any Local Drive using Command prompt


How to Hide any Local Drive using Command prompt


Today Computer World tutorial is about how to hide a local drive without any 3rd party software. There are lots of free and payable software's available to hide local drive, but I'm not gonna talk about hide a local drive using a software. In this tutorial I'll show you an easiest way to hide local drive without using software. This will save your both money and time.

There are 3 methods available to hide a local drive without using any software

1. Hide a drive through gpedit
2. Hide a drive through regedit
3. Hide a drive using command prompt


Today we are covering command prompt way of doing it. So lets see how to do.


How to Hide any Local Drive using Command prompt

How to Hide a Local Drive using command prompt?

1. Click on Start - Run

2. In Run box type cmd and hit Enter. Now Command Prompt window will appear.

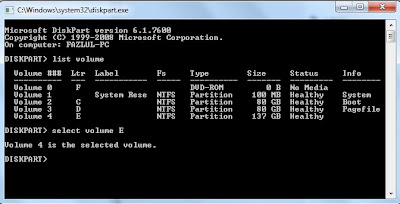
3. In command prompt, type diskpart and hit Enter.

4. Then type list volume and hit Enter.

Now it will display the list of all your computer drives details.


5. Then type the Drive Letter which you want to hide.
If you want to hide volume E, type select volume E and hit Enter.

Now follow mentioned massage will appear to you.
Volume 4 is the selected volume


How to Hide any Local Drive using Command prompt


6. After that, type remove letter E and hit an Enter. 

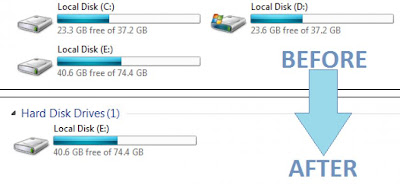
That's all, you have done. Now restart your computer once. When you start your PC again, you want be able to see the
 particular drive in My Computer.


How to get back Hidden Drive again in My Computer.

Do the procedure which i have mentioned in step 1,2,3,4 and 5 again.

Click Start --> Run --> cmd -->

Then type diskpart - list volume - select volume E

After that type assign letter E and hit Enter.

That's all !! You have got back the hidden local drive. Once again restart your PC, now you will be able to see hidden local drive in My Computer.

Note: Your PC doesn't lost any data by doing this trick .

Password Protection to USB Drive without using Software


Password Protection to USB Drive without using Software


Today I'm gonna talk about USB Drives.
I'll show you a simple trick to lock your USB drive without using any 3rd party software.
Most of the people doesn't like other people checking their personal files and folder on USB, including me. This insecure situation creates a huge space to theft our personal data by someone. If you use password protection to your USB, you can reduce the data theft.

Lots of USB password protect software available in present market, but you want to pay money to use it for lifetime. If you're using Windows you don't need any software.


Password Protection to USB Drive without using Software
So let's see how to set a password protect on your USB without using any software.

Insert your USB drive to computer
Click on Start
In "Search programs and files" box, type Bitlocker Drive Encryption
Now launch that application.


Password Protection to USB Drive without using Software

Then look for your USB drive and click on Turn on Bitlocker


Password Protection to USB Drive without using Software

Windows will ask you to set a password. 
Now set a strong password.
Click on Next

Password Protection to USB Drive without using Software

If you want save the password in a safe place.
And click on Next


Password Protection to USB Drive without using Software

Now click on Star Encrypting


Password Protection to USB Drive without using Software

That's all !!! :)
From right now if someone tries to access your USB, Windows will ask him/her to enter the current password.

Note : This trick will works only in Windows