Showing posts with label Windows8 Tips. Show all posts

Monday 8 April 2013

How to Take Snapshots of Videos With VLC Player


VLC is one of the most effective video players on the web with so many glorious options. And now, you'll take the screenshots of your favorite movies and television shows. 1st of all, download and install VLC Media Player.


Open Vlc Player and play the moving picture or show. To take a snap, go to Video >> Snapshot.


Once you are taking the snap, it'll show the placement of the saved pic on the screen.


By default, after you take the snap in VLC player, it saves the file in PNG format. However you'll change the format as well. 

Go to: 

Tools >> Snapshots

and change the format below Video Snapshot section. Now you can change the format from PNG format to JPG format and press OK.


You can even take the photograph with only one click furthermore. To use this, you have got to change the Advanced Controls option in VLC. in order to enable Advanced management choices, 
Go to:

View >> Advanced Controls


Once enabled, you'll see some buttons close to the playback slider in media player VLC. Now to take a snapshot of playing video click on the camera button and it'll take the photo of the video.


And you're done :)

Saturday 6 April 2013

Easy way to increase Speed when using Multiple Applications (Windows)


An easy way to Speed Up your system is just minimising the applications which are not in use.


I know you will not believe this, but I can give you a demonstration.


Steps to Check -
·         Just open any application, say MS WORD.
·         Now Press CTRL+SHIFT+ESC, this will open Windows Task Manager.
·         Now go to the Processes Tab.
·         See the listing of Word, and see how much memory it is consuming.
·         Now minimize Word, and now again observe the memory usage.
·         You will find a significant change in the usage of memory and it will increase your system speed.
So from now on make it a habit of minimising the applications when not in use.
No Response to "Easy way to increase Speed when using Multiple Applications (Windows)"
Post a Comment

Reinstall windows without loosing anything:


You can use this method as often as you like when you need to repair something that had gotten corrupted and you don't want to do a clean install.

This is better than doing a windows repair install from the cd because doing that can cause changes to settings and even make it so you can't get updates anymore from microsoft update site because of the 'silent install' they did a year or so ago (unless you rereg some dll files).


1- Start WindowsXP
2- Go to the location of your source files
3- Run WINNT32 /unattend

For example, D:\I386\winnt32 /unattend ( copy & paste this command into the RUN box, then press ENTER ) Your computer will do the rest.
OR
Start > All Programs > Accessories > Command Prompt. Copy & paste > D:\I386\winnt32 /unattend (notice the space between 32 and / ) Press Enter.
If you have i386 on your drive, you can replace D: ( if D: is your cd drive ) with the location of it. (be sure it's the full i386 though)
D: is the driver letter where your windows XP Cd is if D:\I386\winnt32 /unattend doesn't work then try : d:\winnt32 /unattend.


Create a Fake Virus:

1. Right click on the desktop and choose “Create Shortcut”. 
Right click it >> New>> Shortcut 

2. A New window will pop up, Type in it

shutdown –s –t 900 –c “This Computer is Fuc*** by Maggy”
3. Now click on “NEXT” button. Now you can choose the name of the fake name for the virus file choose anything like :- 

4. Now click on “close” to close the window. a new shortcut would come on the desktop with the name you wanted.

5. Now to change the icon of the shortcut just Follow these steps :-
Right click it >> Properties >> Customize tab  >> Change icon >> Browse >> Choose the icon >> Click OK

6. All done hell yeah…

7. Now just wait and watch..

Changing the Windows 8 Lock screen
  1. Open the Charms by moving the mouse to the right-hand side of the screen or pressing the Windows key + C keys on the keyboard.
  2. In Charms click Settings.
  3. In the PC settings menu click More PC settings at the bottom.
  4. In Personalize under Lock screen select the picture you want to use for the Lock screen.
Tip: At the bottom of the Lock screen section is Lock screen apps, which will allow you to add and remove apps from the Lock screen.


Take a Screen Shot:

Capture an image of what you're working on instantly with a screen grab—it's particularly useful for Web pages you can't copy and paste.
Mac: Apple key + Shift + 3
Whether you're working on the Web or in a word processing program, zoom in or out with this command.
Mac: Apple key + plus sign; Apple key + minus sign


PC: Print Screen (then paste [Ctrl + V] into a Word document)


Change Zoom Level:

Whether you're working on the Web or in a word processing program, zoom in or out with this command.
PC: Ctrl + scroll mouse wheel
Mac: Apple key + plus sign; Apple key + minus sign

Use VLC as Video Cutter


  • Friends ,everybody knows very well about VLC media player .this is fantastic software to watch all kind of  videos format ,music etc . . .Do you know that you may use VLC players as a video cutter .This is not a trick .its a function ,which is included in VLC player .Do you wana try it ?ok ,just follow these steps


  • Launch VLC media player and activate Advanced controls located under the View menu .
  • After activate the advanced controls you will see four extra buttons above the normal play/pause button . We will use the first button from the left called the record button .
  • Now play your desire video ,who you want to cut .
  • Just click on record button ,from where you want to
  • cut the video .
  • Click again record button to stop the recording/cutting .
  • That's it .its so simple .

Test Your Anti-Virus


You can also test your anti virus program for its effectiveness using a simple notepad trick. Follow the steps below to know more:
  • Open Notepad.
  • Copy the code give below in the notepad file:
    X5O!P%@AP[4PZX54(P^)7CC)7}$EICAR-STANDARD-ANTIVIRUS-TEST-FILE!$H+H*
  • Save it with an .exe extension like testvirus.exe
As soon as you save this file, your anti virus program will detect the file (virus) immediately and will attempt to delete it. If this happens then your Antivirus is working properly. If not, then its time to look for some other reliable program.


Friday 5 April 2013

How to Get Back Windows 7 Start Menu to Windows 8

.. Everyone knows that Microsoft has officially released their new product worldwide. Most of the Windows fans have upgraded their PC to new operating system. If you have not still upgrade your PC to Windows 8, click here to Upgrade your PC to Windows 8 OS.

Windows 8 has been released with its new features and facilities. one of its feature in this is Windows 8 startup screen or Windows 8 start menu style. Most of the Windows 8 users don't like this start menu style, because Windows 8 start button is looking good and smart but not very easy to use it. So its not user-friendly when we compare with Windows 7 start menu. 


How to Get Back Windows 7 Start Menu to Windows 8


But there is an option available to customize Windows 8 start menu to Windows 7 start menu style. This will make your stuffs more easy in Windows 8. Users can customize Windows 8 start menu to Windows 7 start menu style by using Stardock Start8. This tool helps you to bring back Windows 7 start menu on Windows 8 OS.

Click Here to Download Start8

After the installation completes, you can see start button in Windows 8, its similar to Windows 7 Start button. So now you can easily access to shut down, devices, music, videos, and documents with one click.

What You will Lose When You Upgrade Your PC to Windows 8 From Different Windows Versions

.. Nowadays Windows 8 is the hot topic among the operating system. Daily huge amount of the Windows lovers are upgrading their PC to Windows 8 OS. This latest operating system consists many new features like Apps, touch screen supports etc. If you have not still upgrade your PC to Windows 8, click here to know how to upgrade PC to Windows 8.Before that let's have a small look on what you will loss when you upgrade PC to Windows 8 OS. 


From windows 7
If you are upgrading your PC from Windows 7, there is no problem. All the personal files, apps and all the Windows settings will automatically get transferred to Windows 8 OS.

From Vista
If you are upgrading your PC from Vista, only Windows Settings and your Personal file will get transfer. And all the installed apps will never get transferred to Windows 8. You have to re-install the particular apps manually.

From XP 
If you are upgrading your PC from Windows XP, you will lose all the Windows settings and Apps. It only transfers the Personal files.

Windows 8 Release Preview
If you are upgrading your PC from Windows 8 Release Preview, it will transfer only your personal files. It will never transfer your windows settings and Apps etc...


Windows Consumer Preview or Windows Developer Preview 
When you transfer your PC to Windows 8 from Windows Consumer Preview or Windows Developer Preview. You will loss everything and you can get back all the personal files manually from Windows old folder.

Here I'll give a screen shot from Microsoft about this,

How to Upgrade your PC to Windows 8

.. This week's top story is Microsoft's Windows 8 operating system. So today Computer World is gonna explain you that how to upgrade your PC to Windows 8 operating system. First of all check the minimum system requirement and other requirement  to run Windows 8 on a PC. Click Here to Know the Minimum System Requirement for Windows 8.


How to Upgrade your PC to Windows 8


How to upgrade your PC to Windows 8

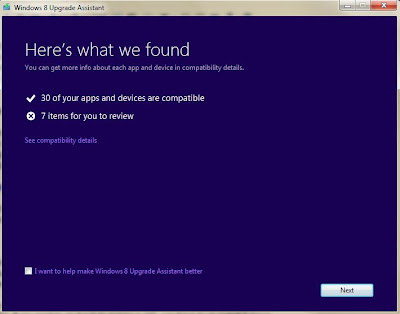
Before buying Windows 8 operating system download the Windows 8 Upgrade Assistanttool and run it on your computer. This free tool will check your PC's specification to install Windows 8. Windows 8 Upgrade Assistant tool do a complete scan and gives you a report about PC hardware and apps.


If this free tool find that your PC can run Windows 8, it will recommend you which edition to buy and some more suggestion. You can purchase Windows 8 here


How to Upgrade your PC to Windows 8


Note : 
If you are upgrading your computer from Windows 7 operating system, all the files and apps will be automatically added to Windows 8. If you are upgrading your computer from other Windows versions, you have to re-install all the apps manually for Windows 8 OS.

After the upgrade of Windows 8 OS, you cant go back to previous version of Windows which you had on your PC. If you want to go back to previous OS, you have to re-install it again.

Download Genuine Windows 8 for Free (90 Day)

.. We all know that Microsoft has released their hot product of Windows 8 this week. Are you interested in Windows 8? are you gonna purchase Windows 8 for your personal PC? 
Wait Wait !!!


Download Genuine Windows 8 for Free (90 Day)

Before purchasing Windows 8, Microsoft gives you a free trail of Windows 8 OS. This offer is a 90 days free trial of Windows 8 Enterprise edition for all the developers. Windows 8 Enterprise edition is available as ISO image in both 32 bit and 64 bit versions for following languages.
Chinese (Simplified)
Chinese (Traditional)
English
English (UK)
German
Korean
Japanese
French
Italian
Portuguese (Brazil) and Spanish. 


How to Download Windows 8 for Free


Go to Microsoft site.

Scroll down the page, now you'll see a option to download 32 bit and 64 bit versions.


Download Genuine Windows 8 for Free (90 Day)

Now it requires you a windows live account. If you don't have an account, create a new account.

After that, give your details and download Windows 8 ISO images for free.

After downloads complete, install Windows 8 to your PC and enjoy with it's new features and facilities for the next 90 days.


Note:
This free trial edition will expire in 90 days and you can't upgrade it. While registering you have to login with Microsoft account and you should provide your name, e-mail ID and your country.

After the installation, you should active the product in online within 10 days gap. And if you want to go back to previous version of Windows, you should do a clean install from original installation media.